The internet is coded on HTML. And knowing HTML basics can help you enhance your web layouts and how items function on your web pages, not to mention help troubleshoot site issues. We know learning all these functions is overwhelming, so we’re giving you some quick codes to help make HTML easy.
Before we get started, I want to point out a few things. HTML is a very handy tool, but to utilize it to its full extent, you must place the code in the proper sequence and format. I’ve created the tags in this article to be ready to use. I would recommend trying to not deviate from the tags and simply insert the text where you need (Example: <b> The text would go between the open tag and closing tag. </b>)
Ready? Then, let’s get started.
Text Modifiers
These tags are used to modify the text that you have written on your page. By emphasizing parts of your text, you will be highlighting areas for the search engines, consequently optimizing for SEO.
Headers
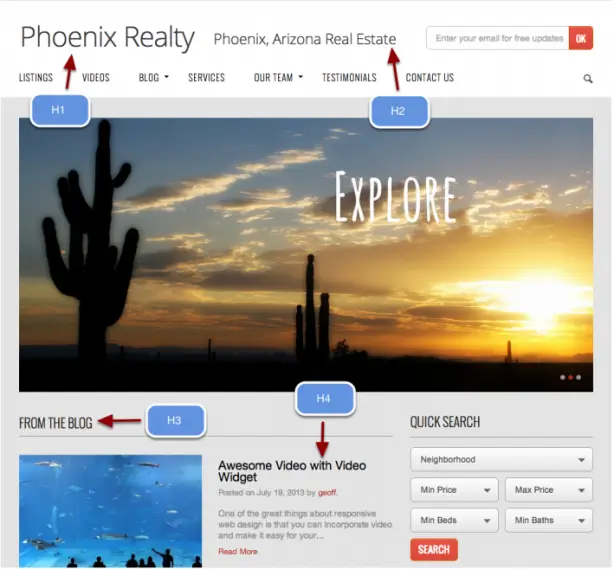
The header tags create larger and emphasized text. A good way to look at the functionality of these tags is to treat your website like a newspaper. The largest header <h1> is for the title of the page. The second largest <h2> would be the name of a section. The third largest <h3> would be the name of a specific post’s title. This progression would continue all the way down to <h6>, which would be treated like a caption of a particular section. The header tags are broken down below from most important and most used to least important:
<h1> </h1> The largest headline (like the title of a newspaper)
<h2> </h2> The second largest headline (like the title of a section of the newspaper)
<h3> </h3> The third largest headline (like the title of an article in a section of the newspaper)
<h4> </h4> The fourth largest headline
<h5> </h5> The fifth largest headline
<h6> </h6> The sixth largest headline (also known as the smallest headline)
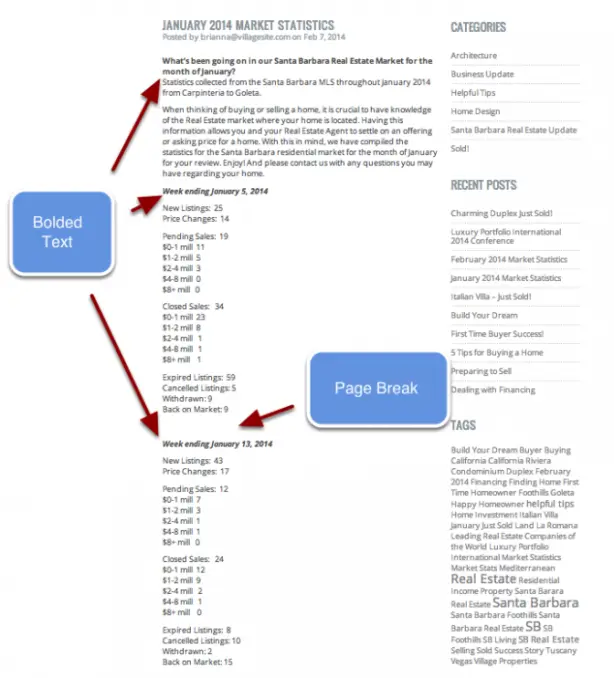
<b> </b> This modifier will make your text bold
<i> </i> This modifier will make your text italic

“Getting information off the Internet is like taking a drink from a fire hydrant.”
— MITCHELL KAPOR

Page Content Formatting
Formatting
Formatting how your page is displayed is very important in a user’s experience. There are three main tags to learn when creating a well-designed page.
<div> </div> This creates a division in the page and is a good way to section off content. A division will allow you to control the other modifications you make to the site by breaking down the larger chunks into smaller, more manageable content pieces.
<p> </p> This function creates a paragraph. This is ideally used for large sections of text. It is important to note that this is different from a division tag. You can have multiple paragraphs in a division. But, creating a paragraph does not denote a division in content, unless explicitly stated.
<br> </br> This creates a line break in the text. The line break function is used if you have a large block of text and don’t want to create two entirely different sections utilizing the paragraph function.
Subsection Formatting
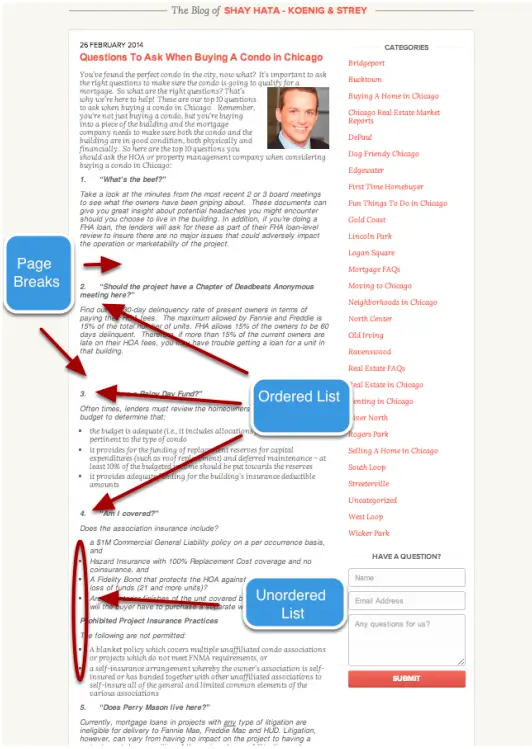
<ol> </ol> This creates an ordered list. When creating a subsection, proper listing will aid users in navigating your site.
<ol>
<li>First list item goes here </li>
<li> Second list item goes here </li>
<li> Third list item goes here </li>
</ol>
It is important to note that with the ordered list tags, the items will be numbered in ascending order: 1, 2, 3, 4, etc. Even if you change the text, the items will always be ordered this way.
Example:
1. Video Tutorial One.
2. Video Tutorial Two.
3. Quiz over Tutorials One and Two.
<ul> </ul> This creates an unordered list.
<ul>
<li> A list item goes here </li>
<li> A list item goes here </li>
<li> A list item goes here </li>
</ul>
The difference between the ordered list item and the unordered list item is that there will be no number assignments in the unordered list item. These lists are typically used when there is no numerical significance to the items. Example:
Home
About
Contact Us
Adding Images
Images are an integral part of websites and the most used tag is:
<img src=”url where the image is found” alt=”another name the image is known as”> This simple tag will insert an image into the post.
You can add modifiers within the tag to impact the layout of photos:
<img src”url” alt=”example picture” border=”12″ align=”left”> Use this within the tag to impact the alignment (left/ right), dimensions (height and width), as well as adding a border to the image.

Links
When creating a multi-page website, links are essential for creating a smooth experience for the user. The links are broken down into different uses:
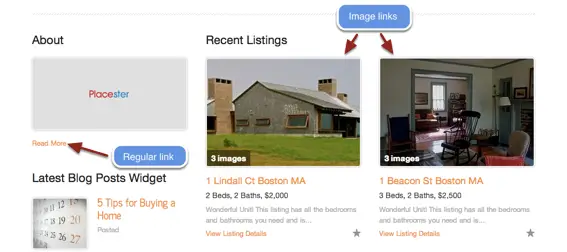
<a href=”URL goes here”> text to be turned into a link would go here </a> This creates a simple hyperlink. Most of the links you will use are variations of this standard link structure.
<a href=”URL goes here”> <img src=”URL goes here”> </a> This will create an image that will function as a link. A good use of this is if you want to use an icon as a link.
“The Internet is just a world passing around notes in a classroom.”
— JON STEWART
Special Characters
Special characters are typically interpreted by the HTML document to represent a function. If you want to display the symbol, it will take a command for it to be visible.
< Will create a [<] less than symbol.
> Will create a [>] greater than symbol.
& Will create an [&] ampersand symbol.
" Will create a [“] quotation mark.
© Will create a [©] copyright symbol.
™ Will create a [™] trademark symbol.
Live Examples

Screenshot image from shayhata.com.

Screenshot image from athomeinsb.com.
For a more in-depth look at the HTML tags that are available, check out Mozilla’s HTML Developer Library. Also, our The Ultimate Guide to Building a Real Estate Website eBook can help answer additional questions you may have about building your website.
Was this HTML Cheat Sheet helpful? Any other quick tips you would like to know? Let us know in the comments!


